| |||||||||||||||||||||
| Panomundo | |||||||||||||||||||||
| 3D Photography by Brian Greenstone, Austin TX | |||||||||||||||||||||
Please help support this site by visiting our sponsors shown at the top and bottom of this page.
| |||||||||||||||||||||
| Panomundo | |||||||||||||||||||||
| 3D Photography by Brian Greenstone, Austin TX | |||||||||||||||||||||
Please help support this site by visiting our sponsors shown at the top and bottom of this page.
| HOW TO: The Process of Making a Pano | |
Section 6: Stitching with PTGuiStitching with PTGui is really nice these days because the application has become so powerful it does almost all of the work for you. You don't need to calibrate your lens anymore, and it does a great job of automatically assigning control points. That being said, there are still some things you need to do manually to achieve good results.
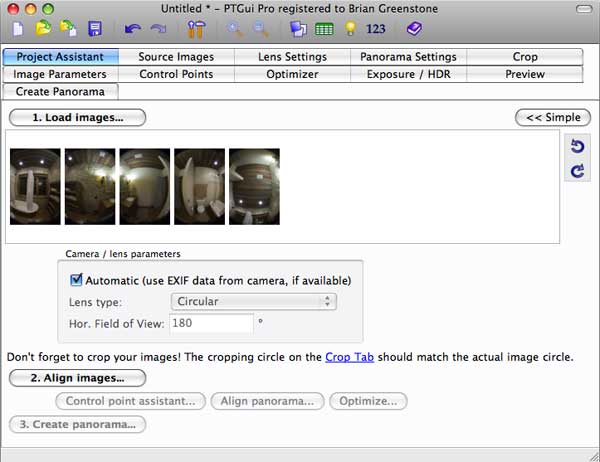
Load ImagesFor our example, we're going to use a pano that has 4 horizontal shots and one zenith. So, we start by dragging all of our images into PTGui. Then click the Advanced button in the upper-right corner so that we'll have access to all of the manual modes we're about to need:
Automatically Align the ImagesNext, click the Align images... button. This will tell PTGui to automatically crop the images, find matching control points among them, and do a first pass of optimizing the image parameters and lens calibration values. Sometimes PTGui will not be able to find control point matches everywhere, and I guarantee that it will generate many bad control points. Don't worry about that - we'll be fixing that in the following steps.
Set Vertical Control PointsVertical Control Points are very important, and many people skip this step because they think they don't need to do it. Trust me, you always need to set vertical control points because those are what insure that your panorama is level and doesn't have a wavy look to it:
This is what can happen if you don't set vertical control points.
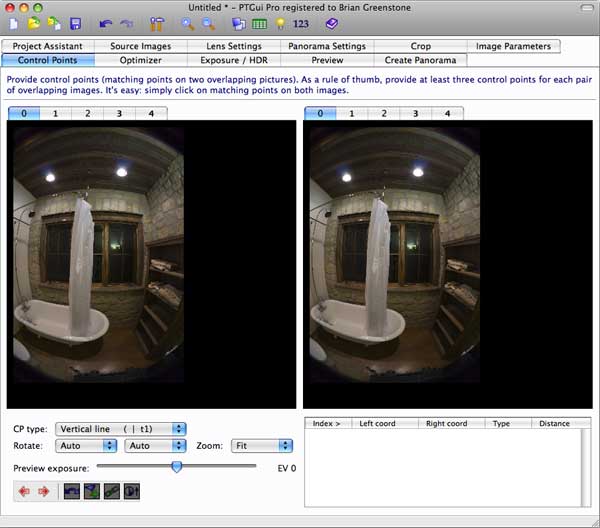
PTGui can find control points between shots, but it cannot find vertical control points in single shots, so we have to do that by hand. Click the Control Points tab to get started. The idea here is that we are going to look for vertical lines such as door jams, window sills, or anything else we know is perfectly vertical in our shots and set a top and bottom control point for them. So, in the Control Points editor start by making both the left and right images be set to #0. When you do this, PTMac automatically knows you are about to create vertical control points, so it sets the "CP type" to "Vertical line":
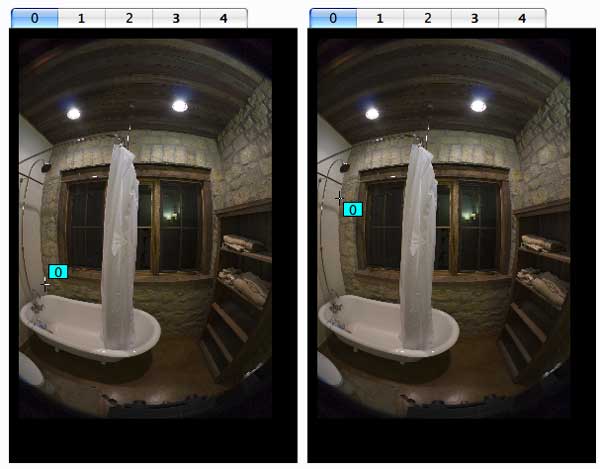
To set the control points click on the bottom of a vertical structure in the left image and then click the top of the vertical structure in the right image (or vice versa). When you click down a control point you can use the arrow keys to fine tune its placement, and it is very important to be as accurate as possible. Here I have set a vertical control point on the corner of the wall:
IMPORTANT NOTE: You do not want your vertical control points to be very long. The optimizing algorithms work better with shorter line segments, so as a general rule try to keep the distance to less than 1/3rd of the height of the entire image. In the case above, I did not put the top control point all the way at the ceiling even though I could. I wanted to keep that vertical line shorter than that. It is good to set as many vertical control points as you can in each of your horizontal shots, but there's no need to go crazy with it. One is sufficient if you think it's a really good and accurate one, but if you can do 2 to 4 then go for it. Anything over 4 is just overkill. If you cannot find a vertical structure in some of your shots then don't sweat it, but if you can find some in each shot then that's great. So, once you've set your vertical control points in Image #0 then click the arrow button to advance to image #1 (or manually select image #1 in the left/right panes). Do this for all of the horizontal shots. Obviously you do not set vertical control points in the zenith or nadir shots.
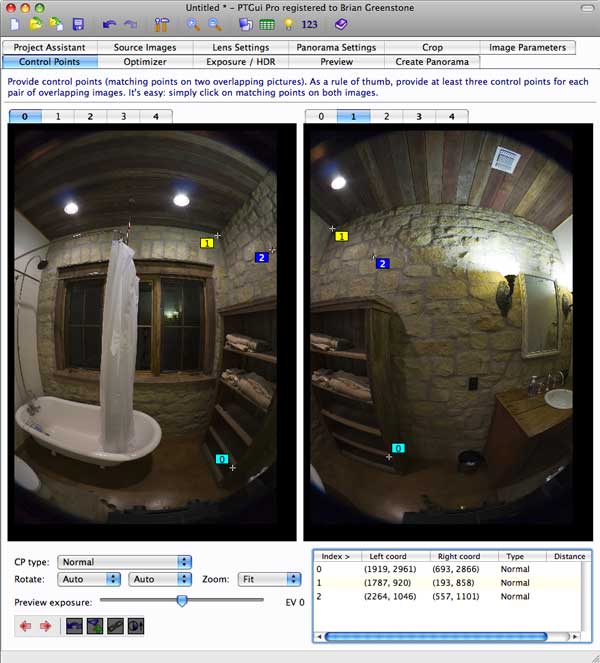
Set Missing Control PointsIf you're shooting a scene with some very blank features such as blank white walls or a clear blue sky, then the automatic control point generator may not have found matching control points between some image pairs when you did the Align Images step earlier. Also, if you were shooting a scene with moving objects such as people, cars, or clouds, then the automatic CP generator may have completely freaked out. In this case, you'll need to manually set some control points by hand. Setting control points between image pairs is almost exactly the same as setting the vertical control points. This time, however, you select one image in the left view, and then the adjacent image in the right view. Then you choose a point shared by both images and set a control point there in both shots. Remember to use the arrow keys to fine tune the placement of the control points - accuracy is very important. So, for example, I have manually set three control points in this screenshot:
You should always try to set a minimum of 3 control points between each image pair, but the more the merrier as long as you can set accurate ones. Also, it is good to spread them out as much as possible - don't clump them all together in one area, and avoid the extreme edges of a fisheye image since the distortion there may just cause errors in the optimization calculations.
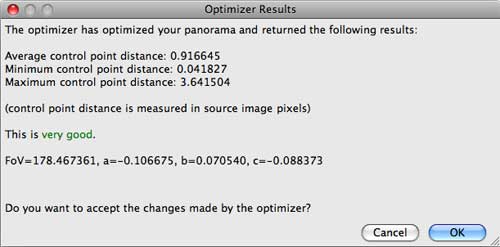
OptimizingOnce you've set your vertical control points and your image pair control points (or had them auto-generated), it's time to attempt to optimize the images. Optimizing calculates the lens calibration parameters and the alignment of shots in the scene. It uses the control points you set between the images to determine how to stitch the shots together. So, click on the Optimizer tab and then click the Advanced button in the Optimizer window. On the left, be sure to click the Horizontal shift and Vertical shift checkboxes. Then click the Run Optimizer button to perform an optimization pass. This will bring up an Optimizer Results window like this:
What we want to achieve during optimization are low numbers. We want the "Average control point distance" to be as low as possible - a value less than 2.0 is usually acceptable, but we strive to get less than 1.0. The "Minimum control point distance" doesn't really matter much, so you can ignore that one, but the "Maximum control point distance" value is also very important. This number basically tells us if there are bogus control points in our panorama. You know you've got good control points when that value is less than 2.0. In the case above, we have a value of 15.08 which is definitely not good even tho the optimizer results actually says "very good" - it lies. So, we want to get rid of the bad control points and then re-optimize. Click the OK button to accept those results and then in the Tools menu select Control Point Table. You will see a new window like this:
Click on the Distance column to make sure the control points are sorted by their optimized distances. In the above example, you can see that the first three control points have unacceptably high distance values. The next few aren't so hot either. Those are the control points that we want to get rid of because they are bad. So, select them and press the Delete key. Now, go back to the Optimizer window and click Run Optimizer again. You now see much better results:
As you can see, the distances are now much, much better. Our average cp distance is less than 1.0 which is fantastic! That maximum of 3.6 is still a tad high, so we can simply go back into the Control Point Table and delete the ones with high values and repeat the process again. Keep doing this until you're happy with the distance values, but be sure not to delete too many control points or you won't have enough remaining to get a good stitch.
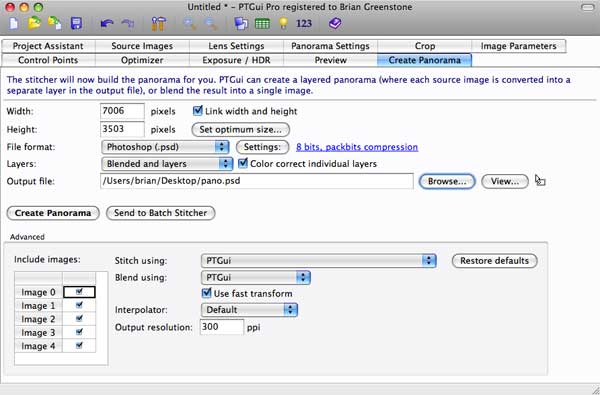
Creating the PanoramaOnce you have nice and low control point distance values you're set to stitch the panorama, so click the Create Panorama tab. This screen always defaults to lousy values, so we need to set lots of things: 1. Click the Set optimum size button and set it to Maximum Size. 2. For File Format select Photoshop(.psd) 3. Under that, for Layers be sure to select Blended and Layers. 4. Then click the Browse button to set the destination of the stitched equirectangular image (I usually set the desktop).
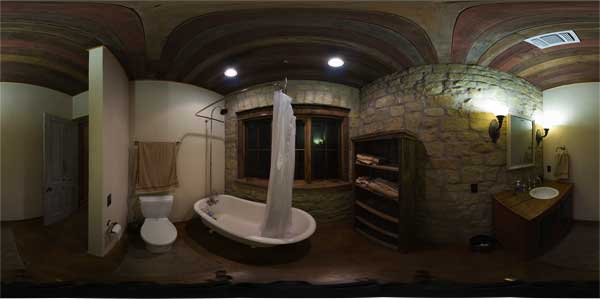
Once you've set all of that click the Create Panorama button to start the magic! If your computer has multiple processors then this should go fairly quickly, and in the end you'll see a nice big Photoshop file sitting on your desktop (or wherever you told PTGui to put it). This file is an "equirectangular" image that we'll use to create the VR pano:
This image that PTGui outputs may be flawless, especially if you got really small control point distances, but very often there will be errors in the stitching that need manual fixing in Photoshop, so on to the next section...
| |||
Please help support this site by visiting our sponsors shown at the top and bottom of this page.
Ask us how we can add 3D panoramas to your web site: brian@pangeasoft.net
Our price list is here
©2005-2009 Brian Greenstone