| |||||||||||||||||||||
| Panomundo | |||||||||||||||||||||
| 3D Photography by Brian Greenstone, Austin TX | |||||||||||||||||||||
Please help support this site by visiting our sponsors shown at the top and bottom of this page.
| |||||||||||||||||||||
| Panomundo | |||||||||||||||||||||
| 3D Photography by Brian Greenstone, Austin TX | |||||||||||||||||||||
Please help support this site by visiting our sponsors shown at the top and bottom of this page.
| HOW TO: The Process of Making a Pano | |
Section 6: Stitching with PTMacMost of the important nuances of PTMac were covered back in Section 2 when I discussed lens calibration, but there are a few additional things to cover when actually creating a real spherical pano. Essentially, everything is the same except that we've got a zenith and optionally a nadir image to contend with, but we don't need to work so hard to optimize the control points since we've already got good lens settings. Load ImagesFor our example, we're going to use a pano that has 6 horizontal shots, 1 zenith, and 1 nadir. So, just like before, we start by loading all of our images into PTMac. Just drag and drop all 8 images into the Source Images window.
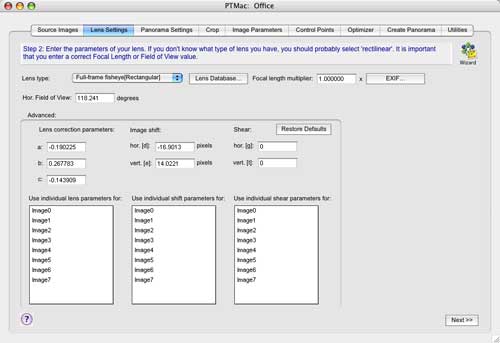
Load Lens Calibration SettingsNext, click the Lens Settings tab and then click the Lens Database button to load up our calibration numbers for our lens:
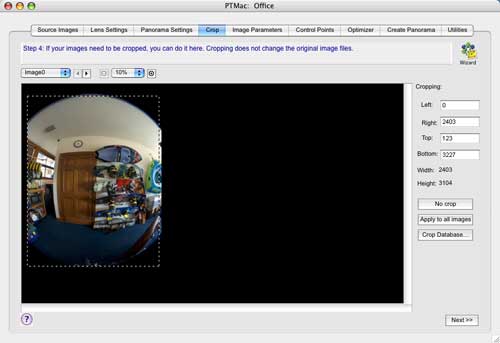
Load the Crop SettingsClick the Crop tab and load the cropping values used to do the lens calibration by clicking the Crop Database button. Then click the Apply to all Images button.
Set the Estimated Yaw Pitch Roll of each ImageThe next step is to set the Yaw, Pitch, Roll (YPR) of each of the images. Click the Image Parameters tab and then set the YPR of each image. The Zenith has a pitch of 90º and the Nadir gets a pitch of -90º. The Yaw of horizontal shots go 0, 60, 120, 180, -120, -60.
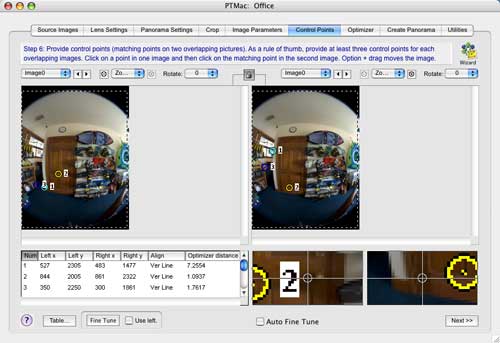
Set Control PointsSetting control points is just like we did for the lens calibration except that you don't need so many control points this time. I usually only set 3 to 6 control point pairs between adjacent images, and I try to avoid the extreme edges of the fisheye images. It is good practice to spread them out as much as possible too - don't clump all the CP's together. The only thing that you need to pay extra attention to here is setting vertical line control points in your anchor image. The "anchor image" is usually the first image you shot since it's likely to be the one that's got the best level and alignment. It is very important that the anchor image be correctly oriented and not tilted in any way. Otherwise, the entire pano may end up with a wavy bend to it like this:
So, to keep everything straight and level, find straight vertical features in your horizontal shots and set "vertical" control points. Set a control point at the bottom of a vertical line in the left image, and then set a control point at the top of that same vertical line in the image on the right. Door jams and window frames are great for this:
It is very important that you set lots of these, and set them in all of the horizontal images that you can - not just the anchor image.
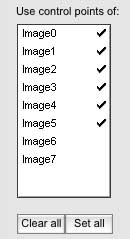
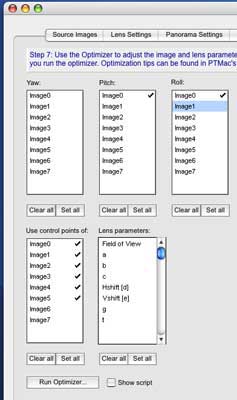
OptimizeNow it's time to Optimize! DO NOT OPTIMIZE THE NADIR/ZENITH IMAGES WITH THE HORIZONTAL IMAGES. The pane that says "Use control points of:" should have only the horizontal images checked. We'll optimize the zenith and nadir shots in a separate step at the end.
The first step to optimizing is to level the anchor image. This is why we set all of those vertical control points earlier. Even though you probably took great care in keeping your camera level when you shot this anchor image, odds are that it's still tilted and/or rolled by a degree or so, and even a fraction of a degree can give us the wavy-pano problem, so it it critical that you always correct your Pitch and Roll values before doing any other optimizations! So, to make sure that the anchor image is perfectly level we have PTMac correct its Roll and Pitch. Do this by checking just the Pitch and the Roll for the anchor image (in our case Image #0):
Now click the Run Optimizer button. What PTMac is doing here is attempting to make those vertical control points actually be vertical. It will calculate the best Pitch and Roll values for the anchor image to fix the anchor image orientation and get it perfectly level. If you want to see what PTMac calculated for the corrected Pitch and Roll values then click on the Image Parameters tab and see what the anchor image's new parameters are set to. With the anchor image now leveled correctly, we can optimize the remaining horizontal images. Check all of the images except for the Anchor image (it doesn't matter if the zenith and nadir images are checked because nothing is going to happen as long as they're not checked in the "Use Control Points of" box).
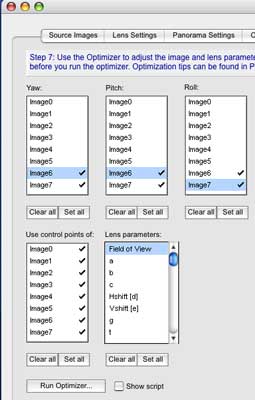
Check all images except the anchor If your cropping values and lens parameters were correctly calibrated earlier, then all you should need to do is click the Run Optimizer button. Normally, you should get Max Control Point distances of no more than about 2.0, but when there are vertical control points set then the optimizer tends to spit out bogus max distance values, so if you see a max distance like 86.4 don't freak out. What you can do to verify your optimizations is to go back and delete all of the vertical control points that you set earlier. We've already fixed the anchor image's roll and pitch values, so the vertical control points aren't needed anymore. Once you've deleted them and you run the Optimizer again then you'll get legitimate max distance values for your control points. If the max control point distances you get are still not as small as you hoped for then you should first verify the accuracy of your control points. If they all look good, then your lens calibration values may not be accurate, so just do a few optimization passes with the FOV, a,b,c,d,e parameters checked - just like we did when we first calibrated the lens. Once you're happy with the optimization of the horizontal images. Go to the "Use control points of" box and check everything. Then, check the YPR of just the Zenith and Nadir images. Run the Optimizer again:
The max control point distance values for the zenith and nadir are almost always going to be larger than what you get for the horizontal shots. This is normal, so don't freak out if you suddenly get max distance values of 10.0 or more. It has to do with the fact that a single zenith or nadir shot is connected to every horizontal shot in the pano, and this cross-linking inevitably leads to larger optimization errors.
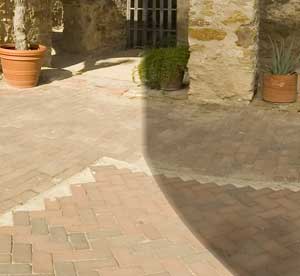
Creating the PanoramaClick on the Create Panorama tab. Click the Apply button to set the size of the pano to the maximum recommended resolution. Next we need to choose a file format. To make a long story short, there's really only one viable option to choose from that pop-up menu: Enblend PSD. Enblend is a free utility that PTMac interfaces with during the stitching process. You must use this or your panos will not come out right, period. What Enblend does is eliminate any ugly seams that will appear in the pano as a result of brightness variances. These brightness variances can be caused by lens vignetting or even by the sun going behind a cloud while you where shooting. If you stitch the pano without Enblend you'll see things like this:
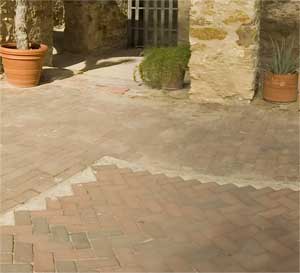
You can clearly see a brightness difference at the seam here. This pano was shot on a cloudy day, and the brightness of the scene kept changing drastically as I was shooting. Here's the same pano, but processed with Enblend:
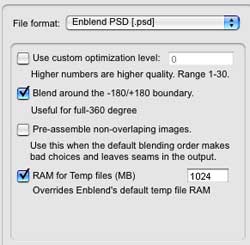
Make sure you've selected the Enblend application in PTMac's Preferences, otherwise PTMac won't know where to look for it when it comes time to use it. You'll also notice that when you select "Enblend PSD" from the File format pop-up menu, several options appear:
Check the "Blend around..." option if you're making a 360º pano. Enblend takes time to process images... lots of time. The more RAM you've got the better, and having a multi-processor Mac helps a lot too. You should always check the "RAM for Temp files" option, and allocate as much as you can afford. I've got 3.5 gigs on my G5, so I usually give 1.3gig (1300MB) to Enblend. This speeds things up considerably since it doesn't have to work from temp files this way. All you've got to do now is click the Create Panorama button and then go away for a while and let PTMac do its thing. When you come back you'll have a nice Photoshop PSD file waiting for you. This file is an "equirectangular" image that we'll use to create the VR pano. This file that PTMac outputs will not be perfect no matter how well you optimized it earlier. There are still some tweaks that we need to do in Photoshop to finalize our pano, so on to the next section...
| |||
Please help support this site by visiting our sponsors shown at the top and bottom of this page.
Ask us how we can add 3D panoramas to your web site: brian@pangeasoft.net
Our price list is here
©2005-2009 Brian Greenstone